
In summary:
- Minimal-impact solutions like offset hinges can add up to 2 inches of clearance without altering the door frame.
- The crucial measurement is the « clear width » (the actual passable space), not the width of the door slab itself.
- Reversing a door’s swing or replacing it with a barn or pocket door can resolve dangerous « trap zones » in tight spaces like bathrooms.
- For renters or in historic homes, even reversible changes like removing door stops can make a significant difference.
The thought of widening a doorway for wheelchair access often conjures images of dust, demolition, and costly structural work. For many homeowners, the primary concern isn’t the project itself, but the fear of compromising a load-bearing wall or embarking on a renovation that spirals out of control. The common advice is often to hire a contractor for major surgery or simply buy a narrower wheelchair, options that feel either too extreme or like a compromise.
But what if the solution isn’t about brute force? True accessibility is often a game of inches, achieved through a deeper understanding of space and mechanics. The key isn’t always demolition; it’s mastering the geometry of clearance. Many effective solutions involve small, intelligent modifications that reclaim critical space with minimal structural impact. These methods focus on how the door interacts with its frame and the surrounding room, rather than tearing the frame out entirely.
This article acts as your structural renovation consultant, moving past the fear of demolition to focus on practical, non-destructive techniques. We will explore how specialized hinges can magically add width, why a 32-inch door is never truly 32 inches wide, and how different door types can fundamentally change the usability of a room. By understanding these principles, you can make informed decisions to enhance mobility and independence at home, confidently and without picking up a sledgehammer.
In this comprehensive guide, we will break down the strategic options available for creating accessible doorways. The following sections detail everything from simple hardware changes to more involved, yet still non-structural, replacements, providing a clear path to a more navigable home.
Summary: A Consultant’s Guide to Widening Doorways Without Demolition
- How to Gain 2 Inches of Width Without Tearing Out the Door Frame?
- Why a 32-Inch Door Isn’t Actually 32 Inches Wide (and Why It Matters)?
- The « Inward Swing » Error That Traps You in the Bathroom
- Pocket Door vs Barn Door: Which Saves More Space and Money?
- How to Install Door Frame Protectors to Prevent Wheelchair Scuffs?
- Transport Chair vs Standard Wheelchair: What Is the Functional Difference?
- Why Standard Rollators Get Stuck in Older Apartment Doorways?
- How to Arrange Your Home Layout to Maintain Independence Without Help?
How to Gain 2 Inches of Width Without Tearing Out the Door Frame?
Before considering any demolition, the most effective and least invasive strategy involves changing the door’s hardware. The goal is to move the door completely out of the doorway when it’s open. Standard hinges leave the thickness of the door itself obstructing the passage, stealing precious inches of clear space. The solution lies in specialized hinges designed specifically to solve this problem.
Offset hinges, also known as swing-clear hinges, are engineered with a unique Z-shape. This design allows the door to swing completely clear of the frame, positioning it parallel to the wall when fully open. This simple mechanical shift can add between 1.5 to 2 inches of usable width to your existing doorway. It’s often the single most powerful, cost-effective modification you can make. The illustration below highlights the mechanical principle of how the hinge repositions the door slab.
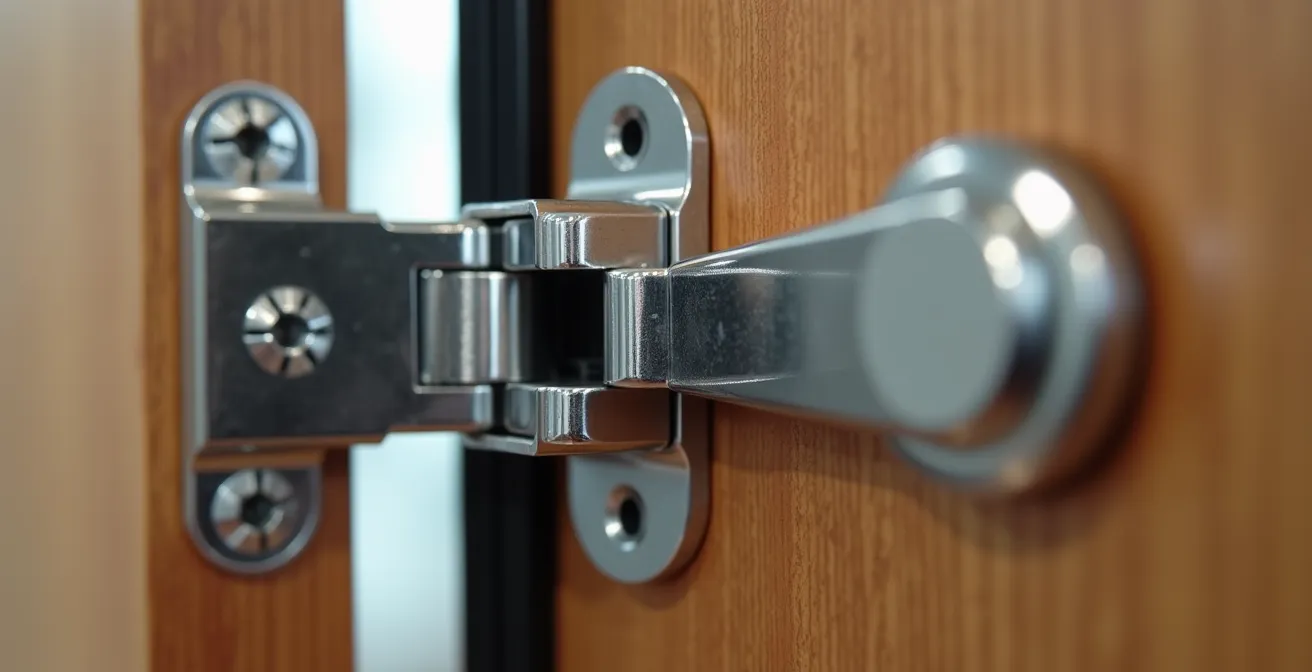
As you can see, the pivot point is shifted away from the frame, which is the secret to gaining that extra clearance. Installing them is typically a straightforward DIY project, as they are designed to fit into the existing screw holes of standard hinges. The process is simple:
- Step 1: Remove existing hinges from both the door jamb and door, saving all screws for reuse.
- Step 2: Attach the offset hinge to the door with countersunk holes facing you, screwing into existing holes.
- Step 3: Mount the other side of the offset hinge to the door jamb, ensuring at least 3 inches of clearance behind the door for it to swing open fully.
While offset hinges are a popular choice, they are part of a family of accessible hardware. This table provides a quick comparison of the most common types for minimal-impact widening.
| Hinge Type | Width Gained | Cost Range | Installation Difficulty |
|---|---|---|---|
| Offset Hinges | 1.5-2 inches | $50-100 | Easy (DIY) |
| Swing-Clear Hinges | 1.75-2 inches | $30-50 | Easy (DIY) |
| Double-Action Hinges | 2 inches | $60-120 | Moderate |
This one modification can often be the difference between a tight squeeze and comfortable passage, making it the first and most logical step in any accessibility audit of your home.
Why a 32-Inch Door Isn’t Actually 32 Inches Wide (and Why It Matters)?
One of the most common and costly misconceptions in home accessibility is assuming a door’s advertised size is its usable width. A « 32-inch door » refers to the width of the door slab itself. However, the actual navigable space, known as the « clear width, » is always less. This is because the door stops (the thin strips of wood on the frame that the door rests against when closed) and the thickness of the door itself when open subtract from the total width.
Typically, a standard 32-inch hinged door provides only about 29 to 30 inches of clear width, depending on the thickness of the door and stops. This « illusion of width » is a critical point of failure for wheelchair accessibility. Many standard wheelchairs require at least 32 inches of clearance, which is why a seemingly adequate doorway can become an impassable barrier. This isn’t just a matter of convenience; it’s a standard rooted in safety and function. For instance, ADA standards mandate a minimum clear width of 32 inches for accessible doorways.
Understanding this distinction is the first step toward effective problem-solving. It reframes the challenge: your goal is not to have a 32-inch door, but to achieve 32 inches of clear, unobstructed passage. This is why solutions like offset hinges are so effective—they directly target the factors that reduce clear width by moving the door slab out of the equation. Measuring the clear width of every crucial doorway in your home (from the face of the open door to the opposite stop on the frame) is the most important diagnostic you can perform. This single measurement will tell you exactly where your accessibility gaps are and how many inches you need to gain.
Without this knowledge, you risk investing in solutions that don’t address the core geometrical problem, leading to continued frustration and wasted resources.
The « Inward Swing » Error That Traps You in the Bathroom
Doorway width is only half the battle; the door’s swing geometry is just as critical, especially in confined spaces like bathrooms or small bedrooms. A common and dangerous configuration is a narrow door that swings inward. For a wheelchair user, this creates a « trap zone. » Once inside, the arc of the closing door can block the wheelchair, making it difficult or impossible to exit without assistance. In an emergency, such as a fall, an inward-swinging door can be completely blocked, preventing rescuers from entering.
Correcting this flaw is a crucial safety and accessibility upgrade. Fortunately, several tiered solutions exist, ranging from no-cost to moderate investment, that don’t require altering the frame itself. The most effective approach depends on your budget and the specific layout of the room.
- Free Solution: The simplest fix is to remove the door entirely and replace it with a tension-rod privacy curtain. This instantly eliminates the swing-arc problem, though it offers limited sound and odor privacy.
- Low-Cost Solution: Reverse the door swing to open outward into the hallway. This requires moving the hinges and strike plate to the opposite side of the frame but is a highly effective way to free up interior floor space.
- Moderate-Cost Solution: For situations where an outward swing isn’t practical, installing emergency lift-off or breakaway hinges allows the door to be removed from its frame from the outside in an emergency.
- Higher-Cost Solution: Installing a surface-mounted barn door completely eliminates the swing-arc issue while providing a more permanent and stylish solution than a curtain.
Even if structural changes are not possible, immediate safety measures can be taken. The Age Fearless Academy advises a crucial, no-cost action plan in their Doorway Accessibility Guide: replace any privacy lock on a bathroom door with a simple passage knob (which can’t be locked) and ensure a phone is always kept within reach inside the room. This mitigates the risk of being trapped and unable to call for help.
Choosing the right solution ensures that a bathroom remains a place of independence, not a potential hazard.
Pocket Door vs Barn Door: Which Saves More Space and Money?
When reversing a door’s swing isn’t an option, replacing it with a sliding system is the next logical step. Both pocket doors and barn doors eliminate the « swing arc » that consumes valuable floor space, making them excellent choices for accessibility. However, they differ significantly in installation complexity, cost, and how they interact with the surrounding walls. The choice between them is a critical strategic decision.
A pocket door slides into a cavity built inside the wall, making it completely disappear when open. This offers the ultimate space-saving solution, as it frees up both the interior room space and the adjacent wall space. However, this advantage comes at a high cost and complexity. Retrofitting a pocket door into an existing wall requires significant demolition to create the cavity, a process that is often disruptive and expensive. A barn door, by contrast, is a surface-mounted system. The door slides along a track installed on the face of the wall, covering a section of the wall when open. Installation is far simpler and less expensive, as it doesn’t require opening up the wall. The trade-off is that it renders a portion of your wall unusable for art, furniture, or light switches.
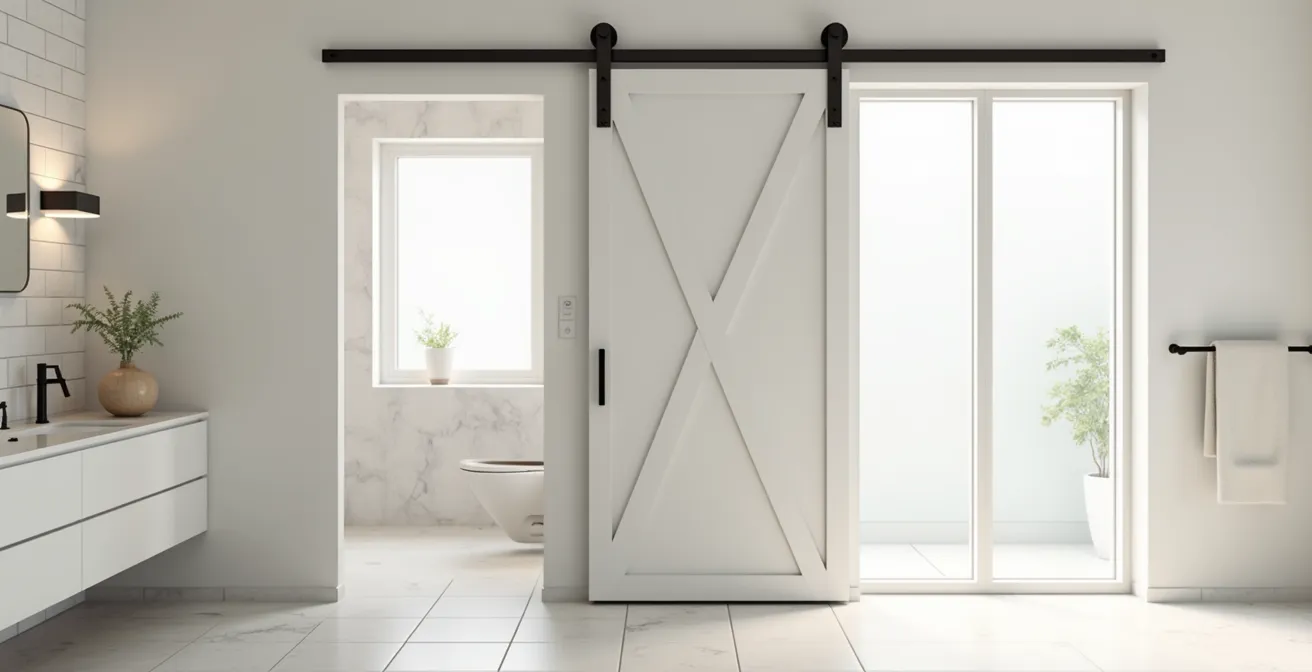
For accessibility, the visual and physical presence of the barn door’s track and the door itself can be both a pro and a con. The visible hardware can be easier to operate for some, but it also means the wall space it covers is permanently occupied. The following table breaks down the key differences:
| Feature | Pocket Door | Barn Door |
|---|---|---|
| Installation Cost (Existing Wall) | $1,400-$3,000 | $500-$1,200 |
| Installation Difficulty | Complex (requires wall cavity) | Simple (surface-mounted) |
| Space When Open | Completely hidden | Covers wall space |
| Privacy/Sound | Poor | Poor |
| Accessibility | Lighter, easier to slide | Heavier, visible track |
For most homeowners seeking a minimal structural impact solution, the barn door is often the more practical and affordable choice, delivering the primary benefit of eliminating the door’s swing without major renovation.
How to Install Door Frame Protectors to Prevent Wheelchair Scuffs?
After successfully widening your doorways, the next step is to protect your investment. The daily negotiation of doorways with a wheelchair or walker can quickly lead to scuffs, dents, and chipped paint on door frames and surrounding walls. Installing door frame protectors is a proactive measure that preserves the appearance of your home and reduces long-term maintenance. These are not merely cosmetic; they are a functional part of a complete accessibility solution.
Protectors come in various materials, each offering a different balance of durability, visibility, and aesthetics. The selection of the right material should be a deliberate choice based on the user’s needs and the home’s decor. The goal is to provide robust protection without making the home feel overly institutional.
Here is a guide to help you choose the most suitable material for your door frames and adjacent areas:
- Clear Polycarbonate: This is the ideal choice for maintaining your home’s existing aesthetic. These transparent strips are nearly invisible once installed, offering excellent impact resistance without altering the visual appearance of your wood or painted frames.
- High-Contrast Kydex: For users with low vision, visibility is as important as protection. Kydex protectors are available in various colors, allowing you to choose a high-contrast option (e.g., black on a white frame) that serves as a visual guide, making it easier to navigate the doorway without collision.
- Stainless Steel: In high-traffic areas or homes requiring institutional-level durability, stainless steel provides the ultimate protection. While more industrial in appearance, it is virtually indestructible and easy to clean.
A comprehensive protection strategy should also extend beyond the immediate door frame. Narrow hallways leading to doorways are also prone to damage. Consider installing matching protectors on vulnerable wall corners and baseboards to create a fully protected, stress-free path of travel throughout the home.
This small investment pays dividends by maintaining the integrity and beauty of your home while accommodating the realities of daily mobility aid use.
Transport Chair vs Standard Wheelchair: What Is the Functional Difference?
While most of this discussion focuses on modifying the environment, it’s also crucial to consider the equipment itself. Not all wheelchairs are created equal, and their dimensions can be the deciding factor in home accessibility. The primary distinction is between a standard wheelchair and a transport chair. A standard wheelchair has large rear wheels with push rims, allowing the user to self-propel. A transport chair has four small wheels and must be pushed by a caregiver.
This functional difference has a significant impact on width. Because they lack the large, protruding rear wheels and push rims, transport chairs are considerably narrower than their standard counterparts. This inherent design advantage can be a powerful tool in your accessibility arsenal, especially when dealing with older homes where doorways cannot be easily modified. Many standard wheelchairs struggle with doorways less than 30 inches wide, while a transport chair can often navigate them with ease.
For context, transport wheelchairs, which typically have a 16 to 22-inch seat width, are significantly narrower overall than self-propelled models that need to accommodate the large drive wheels. This can be a difference of 4-6 inches in total width, which is substantial when navigating tight indoor spaces. For many, using a narrower transport chair for indoor mobility can eliminate the need for any structural modifications at all. It allows for independence within the home, reserving the larger, self-propelled chair for outdoor use.
This doesn’t mean a transport chair is always the better option. The trade-off is a loss of self-propulsion, which can impact a user’s independence if they live alone. However, in a household with a caregiver, or for a user who primarily needs assistance moving between rooms, a transport chair is a highly practical and often overlooked solution to the narrow doorway problem.
It opens up the possibility that the simplest solution might not be changing the door, but changing the chair used to go through it.
Why Standard Rollators Get Stuck in Older Apartment Doorways?
For individuals living in older apartments or pre-war buildings, the challenge of narrow doorways is often magnified. These buildings were constructed long before modern accessibility standards were conceived, resulting in passages that are frustratingly narrow for today’s mobility aids. It’s not uncommon to find that even a standard rollator or walker, let alone a wheelchair, gets stuck.
The root of the problem is historical building code. While modern homes are built with wider doorways as a standard, older properties frequently feature passages that are significantly more constrained. In fact, it is not unusual for these buildings to have doorways measuring only 24 to 28 inches wide, a relic of a time when this was considered perfectly adequate. When you account for the loss of clear width from door stops and the door itself, the navigable space can shrink to as little as 22 inches, making passage impossible for most standard mobility equipment.
For renters, this presents a unique dilemma. Major structural changes are usually forbidden by lease agreements, and landlords may be hesitant to approve even minor modifications. This is where a strategy of negotiation and minimal, reversible changes becomes paramount. Proposing non-damaging solutions can increase the likelihood of getting a landlord’s approval. Having a clear, documented plan shows you are a responsible tenant who respects the property.
Your Renter’s Negotiation Checklist: A Plan for Landlord Approval
- Measure all doorways and tight corners before purchasing any mobility equipment to ensure you know your exact constraints.
- Document the current condition of all doors and frames with clear photographs before proposing or making any modifications.
- Request the temporary removal of door stops. This is a simple, reversible modification that can gain a crucial inch of width.
- Propose the complete removal of a non-essential door (e.g., a closet or even a bathroom door) to be replaced with a privacy curtain as a non-damaging alternative.
- Offer to sign a written agreement to pay for the professional restoration of all original conditions upon move-out.
This transforms the request from a potential problem for the landlord into a collaborative effort to ensure safe and reasonable accommodation.
Key takeaways
- Minimal-impact solutions like offset hinges are the first and most effective way to gain up to 2 inches of doorway width without demolition.
- The crucial metric for accessibility is « clear width »—the actual passable space—not the advertised size of the door slab.
- The direction a door swings is a major safety factor; an inward-swinging door in a small bathroom can create a dangerous « trap zone. »
How to Arrange Your Home Layout to Maintain Independence Without Help?
Achieving true independence at home goes beyond simply being able to pass through a doorway. It involves creating an entire environment that is navigable, logical, and designed around seated reach and mobility. Once doorways are addressed, the focus should shift to the overall home layout, creating clear pathways and organizing key items for easy access from a wheelchair or walker. This holistic approach, often called « home zoning, » is what truly transforms a house into an accessible home.
The strategy involves analyzing your daily routines and reorganizing your space to minimize obstacles and reduce the need for assistance. This means ensuring there are clear 36-inch pathways in all major traffic areas, arranging furniture to allow for wide turning radii (especially in the living room and bedroom), and lowering frequently used items. According to Inclinator, a leading accessibility solutions company, focusing changes on doorways, corridors, stairs, kitchens, and bathrooms maximizes mobility and delivers the greatest impact on daily independence.
A « Seated Reachability Audit » is a practical way to start this process. Sit in your wheelchair or a standard chair and move through your home, taking note of everything that is difficult or impossible to access. This simple exercise will reveal numerous opportunities for small but significant improvements.
- Check Switches and Controls: Are light switches, thermostats, and electrical outlets within comfortable reach? The ideal height is between 15 and 48 inches from the floor. Light switch extenders are a simple, no-cost fix for switches that are too high.
- Reorganize Kitchens and Closets: Move frequently used dishes, food items, and clothing to lower shelves or drawers. The « prime zone » for accessible storage is between 15 inches (to avoid bending too low) and 48 inches (the maximum high reach for most seated users).
- Replace Door Knobs: Twisting and turning a traditional doorknob can be difficult for individuals with limited hand strength or arthritis. Replacing them with lever-style handles is an inexpensive and impactful upgrade.
- Create Clear Pathways: Remove unnecessary clutter, area rugs that can bunch up, and small pieces of furniture that impede clear pathways between rooms.
By applying these principles of layout and organization, you can create a seamless environment that empowers autonomy and ensures every part of the home is a space of comfort and independence, not a series of obstacles.