Effective fall prevention for a shuffling parent is not about generic decluttering; it’s a forensic audit of ‘micro-hazards’ that catch the foot.
- The most dangerous risks are often the smallest: rug edges, floor transitions, and worn-out cane tips.
- Lighting is crucial, but the real danger lies in the abrupt transition between bright and dark areas, causing temporary blindness.
Recommendation: Begin by performing the « Toe-Kick Test » on all furniture and pathways to immediately identify and measure critical catch-point risks.
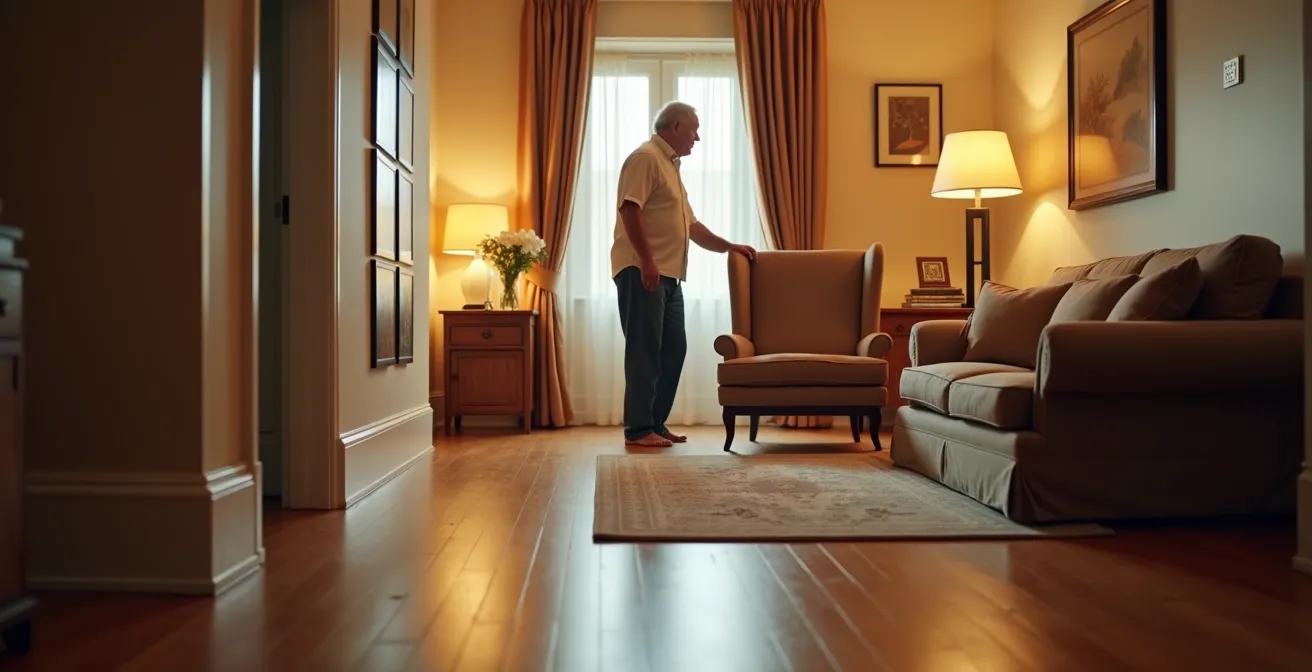
Watching a parent’s gait change to a shuffle is a deeply concerning experience. Every step seems tentative, and the fear of a fall hangs in the air. You’ve likely heard the standard advice: « remove clutter, » « improve the lighting, » and « secure loose rugs. » While well-intentioned, this advice barely scratches the surface. It treats the symptom, not the disease. These generic checklists fail to address the specific physics of a shuffling walk, where even a quarter-inch obstacle can become an insurmountable hurdle.
The problem is that we see a living room, a place of comfort and memories. To truly protect your loved one, you must learn to see it as a fall prevention auditor does: a grid of potential trip points and micro-hazards. The key isn’t just removing obvious dangers, but understanding the subtle environmental flaws that are invisible to most but catastrophic for a shuffling gait. It requires a shift in perspective—from general tidiness to a forensic ‘catch-point’ analysis.
This guide will teach you that new perspective. We will move beyond the platitudes and give you the meticulous, eagle-eyed framework of a professional auditor. We will dissect the most common but overlooked dangers, from the deceptive safety of certain carpets to the lighting error that causes momentary blindness. You will learn to perform specific tests and identify risks with precision, transforming the living space from a field of hidden dangers into a true safe haven.
To help you navigate this critical task, this guide is structured as a room-by-room audit. We will cover the most pressing hazards, providing clear, actionable steps to identify and neutralize them effectively.
Summary: A Forensic Audit of Living Room Fall Risks
- Why Throw Rugs Are the Number One Enemy of Senior Safety?
- How to Perform the « Toe-Kick » Test on Furniture to Prevent Stumbles?
- The Lighting Error That Blinds Seniors Moving Between Rooms
- Carpet vs Hardwood: Which Is Safer for Shuffling Gaits?
- How to Fall-Proof Your Home in Stages Before Winter Arrives?
- The Worn-Out Ferrule Mistake That Turns Your Cane Into a Skate
- The « Extension Cord » Error That Causes Fires and Trips Simultaneously
- Which Non-Slip Floor Coverings Offer the Best Safety Rating for Kitchens?
Why Throw Rugs Are the Number One Enemy of Senior Safety?
In the world of fall prevention, the throw rug is public enemy number one, especially when dealing with the shuffling gait factor. A person with a strong, healthy gait lifts their feet high off the ground, easily clearing most obstacles. Someone who shuffles, however, has a minimal foot clearance—often less than an half-inch. For them, the curled edge of a throw rug isn’t a minor bump; it’s a wall. The toe of the shoe catches, forward momentum continues, and a fall becomes almost inevitable. This single, simple hazard is a leading contributor to serious injuries among older adults.
The scale of the problem is staggering. Falls are not a minor issue; they are the leading cause of fatal and nonfatal injuries for older Americans. Data confirms that over 14 million older adults (1 in 4) report falling every year, with many of these incidents occurring within the perceived safety of their own homes. The throw rug, with its shifting position and tendency to bunch and curl, is a primary culprit in creating these devastating trip points. Even rugs with so-called « non-slip » backing can fold over on themselves, creating a thick, unstable edge.
An auditor’s first and most uncompromising recommendation is always the same: remove all throw rugs and runners. This is not a suggestion; it is a mandate for creating a baseline of safety. There is no rug valuable enough to risk a hip fracture. The goal is to create a smooth, predictable, and continuous surface across the entire living space, eliminating the primary catch-point that plagues a shuffling gait.
How to Perform the « Toe-Kick » Test on Furniture to Prevent Stumbles?
Once rugs are removed, the next stage of the audit focuses on fixed objects: the furniture. A common mistake is to arrange furniture for aesthetics, not for navigation. For a senior who shuffles or uses a walker, the layout of a room is a critical safety feature. The « Toe-Kick Test » is a simple but effective mental model and physical check to assess this. It’s a ‘catch-point’ analysis for your furniture. Walk the primary paths your parent takes—from their favorite chair to the door, to the kitchen, to the bathroom—and pay close attention to the space at floor level.
The test involves imagining or gently mimicking a shuffling foot’s path. As you walk, does your toe « kick » or catch on the leg of a coffee table? Does a walker get snagged on the corner of an end table? A safe pathway requires at least 36 inches of clear width, but the base is just as important. Furniture with splayed legs, pedestal bases, or low-profile supports that extend outward are significant micro-hazards. Opt for furniture with straight, vertical legs or solid bases that don’t protrude into the walking path. This principle is a cornerstone of professional fall-proofing strategies, including those used by the VA Medical Center, which emphasizes that creating clear, unobstructed pathways is a critical factor in reducing fall rates.
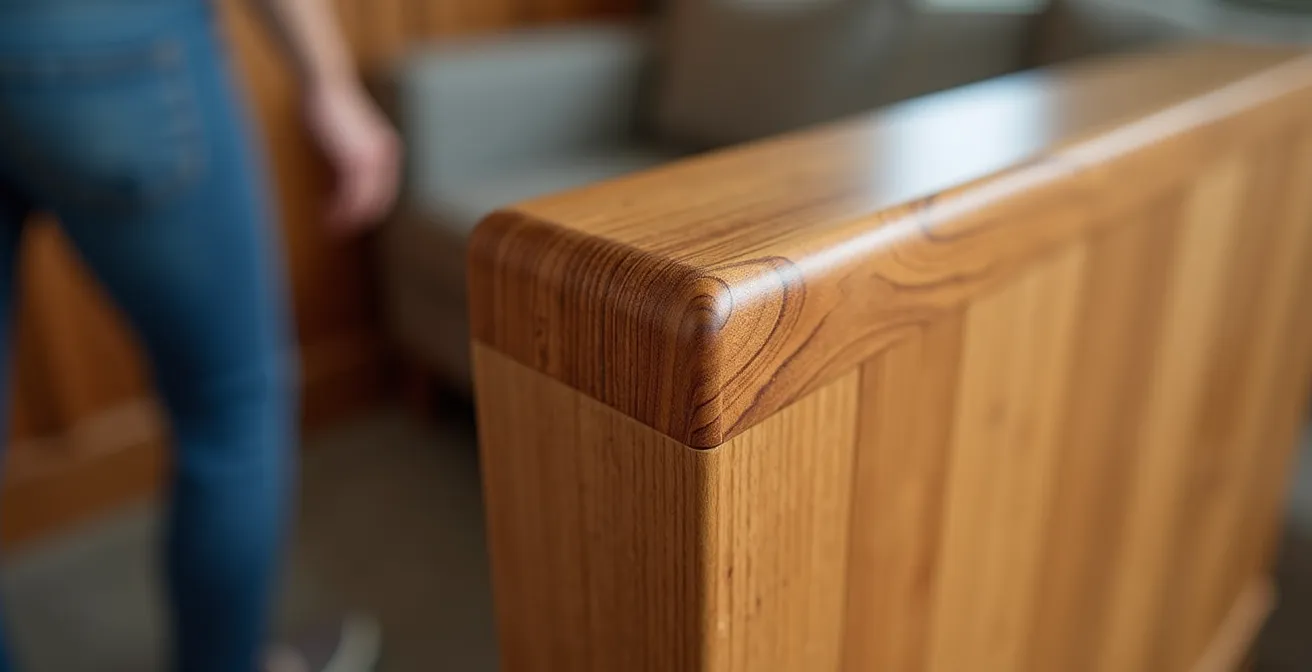
Beyond the base, consider the corners and edges at hip height, as shown in the image above. Sharp corners on coffee tables, entertainment centers, or bookshelves can cause serious injury during a stumble. Installing soft, rounded corner guards is a small modification that provides a huge safety benefit. This detailed inspection of furniture from floor to hip is the essence of a thorough safety audit.
The Lighting Error That Blinds Seniors Moving Between Rooms
Poor lighting is a well-known fall risk, but the most dangerous lighting error isn’t just a dim room; it’s the abrupt change in brightness between spaces. This creates a phenomenon we can call ‘light-transition blindness.’ An older adult’s eyes adapt to changes in light far more slowly than a younger person’s. When moving from a brightly lit living room into a dim hallway or bathroom, they can be functionally blind for several seconds. It is during these critical seconds of impaired vision that they are most likely to miss a step, misjudge a doorway, or trip over an unseen object.
The goal is not just to make rooms bright, but to create consistent, layered, and automated lighting that minimizes these stark transitions. The impact of proper lighting is not trivial; research shows a direct correlation between illumination levels and fall reduction. In fact, one study found that each tenfold increase in room lighting was associated with 35% fewer falls. This underscores the need for a strategic lighting audit. Use a combination of ambient (overhead), task (reading lamps), and accent lighting to create an evenly lit environment without harsh shadows or glare, which can be just as disorienting as darkness.
To effectively combat light-transition blindness, a strategic approach to lighting placement and type is essential. The following table outlines practical solutions for creating safe, evenly-lit pathways throughout the home.
| Room Type | Recommended Solution | Key Benefit |
|---|---|---|
| Hallways | Motion-sensing LED strips | Automatic activation prevents dark navigation |
| Bedroom to Bathroom | Low-level pathway lights | Preserves night vision while providing guidance |
| Stairways | Switches at both top and bottom | Ensures lighting control from either direction |
| Living Areas | Dimmable high-intensity LEDs | Adjustable brightness prevents glare |
Ultimately, the key is automation and accessibility. Motion sensors in hallways and low-lumen nightlights that stay on all night create a seamless web of light. Ensure light switches are accessible at the entrance of every room, so no one ever has to enter a dark space to find the light.
Carpet vs Hardwood: Which Is Safer for Shuffling Gaits?
The debate between carpet and hardwood flooring for senior safety is complex, with valid arguments on both sides. Hardwood or other hard surfaces (like LVT) offer a low-friction, stable plane that is ideal for walkers and wheelchairs. There is no pile to catch a shuffling toe, making movement easier. However, the downside is significant: a fall on a hard surface is much more likely to result in a serious injury, such as a fracture. Carpet, especially low-pile varieties, provides a softer landing and can reduce the severity of an injury. The trade-off is that even low-pile carpet can create more friction, making a shuffling gait more difficult, and worn or buckled carpet can create its own trip hazards.
However, an experienced auditor knows that the choice of material is secondary to a much greater risk. As the National Institute on Aging astutely points out, the real danger is in the change from one surface to another. Their experts state:
The single greatest flooring risk is often the transition between two different flooring types. A tiny height difference becomes a major hurdle for a shuffling foot or a walker.
– National Institute on Aging, Preventing Falls at Home: Room by Room Guide
This is the essence of a friction audit. Your focus should be on every threshold and transition strip in the home. A standard transition strip can be a half-inch high—a mountain for a shuffling foot. The ideal solution is zero-transition flooring, where the same material flows seamlessly from room to room. If that’s not possible, replace high-profile transition strips with low-profile, beveled, or ramp-style ones that are no more than a quarter-inch high at their peak.
Your 5-Step Flooring Transition Audit
- Identify Contact Points: Map all points where flooring types change (e.g., carpet to tile, hardwood to vinyl).
- Inventory Existing Conditions: Use a ruler to measure the height of each transition strip. Note any that are above 1/4 inch or have sharp, vertical edges.
- Assess for Coherence: Check for buckling carpet or cracked tiles near transitions. Does the transition create a « dam » that could catch a toe or walker wheel?
- Evaluate Emotional Impact: Are transitions clearly visible? A transition from dark wood to light tile is easier to see than two similar beige tones. Poor contrast is a hidden risk.
- Create an Action Plan: Prioritize replacing the highest-risk transitions first. Plan to install low-profile, beveled strips and consider adding high-contrast, non-slip tape to mark any unavoidable height changes.
In the end, the safest floor is the one that is most consistent. Whether carpet or hardwood, a single, continuous, well-maintained surface will always be safer than a patchwork of different materials with hazardous transitions between them.
How to Fall-Proof Your Home in Stages Before Winter Arrives?
The prospect of fall-proofing an entire home can feel overwhelming. A pragmatic, staged approach makes the task manageable and ensures the highest-impact changes are made first. Winter is a particularly critical time; shorter days mean more hours spent in artificial light, and inclement weather can make outdoor activity impossible, increasing time spent indoors. A seasonal audit, starting in early autumn, allows you to methodically address risks before they become acute. The goal is to complete the most critical interior modifications before the weather turns.
This process can be broken down into logical stages based on effort and impact. Early autumn is the time for low-effort, high-impact « quick wins. » This includes the non-negotiable removal of all throw rugs, securing every electrical cord along walls, and installing a network of plug-in nightlights. As the season progresses, you can move on to more involved projects that may require assistance, such as installing grab bars or upgrading light fixtures. This phased approach prevents burnout and builds momentum.
This is what a proactive, seasonal priority matrix looks like for an auditor. It balances immediate safety gains with the practical realities of time and effort, ensuring the home is a fortress of safety by the time winter sets in.
| Stage | Timing | Priority Actions | Effort Level |
|---|---|---|---|
| Stage 1 | Early Autumn | Remove rugs, install nightlights, secure cords | Low effort, High impact |
| Stage 2 | Late Autumn | Upgrade lighting, add grab bars, rearrange furniture | Medium effort, High impact |
| Stage 3 | Early Winter | Address entryways, add non-slip mats, check heating | High effort, Medium impact |
| Stage 4 | Mid-Winter | Monitor and adjust, declutter accumulated items | Low effort, Maintenance |
Special attention should be paid to entryways during the winter months. A wet or snowy shoe on a smooth indoor floor is an extreme slip hazard. A high-traction, non-slip mat at every entrance is essential, as is a sturdy grab bar to provide stability while removing winter boots.

By breaking the project into these manageable stages, you can systematically eliminate hazards and create a truly safe environment for the challenging winter months ahead.
The Worn-Out Ferrule Mistake That Turns Your Cane Into a Skate
For a senior who relies on a cane for stability, that small rubber tip at the bottom—the ferrule—is the single most critical safety component. It is the ‘tire’ of the walking aid, designed to grip the floor and prevent slipping. Yet, it is one of the most frequently neglected micro-hazards. Over time and with use, the textured treads on the ferrule wear down. The rubber becomes smooth, hard, and polished from friction with the ground. At this point, the cane is no longer a stability device; it is a liability. On a smooth surface like tile, laminate, or polished wood, a worn ferrule has almost no grip, effectively turning the cane into a skate.
This is a subtle but deadly mistake. The visual appearance of the cane can be perfect, but the point of contact with the world is compromised. The user, accustomed to relying on the cane for support, places their weight on it, only to have it slide out from under them, leading to a sudden and often severe fall. This is why a regular ferrule health check is a non-negotiable part of any home safety audit for a cane user. It’s a quick, simple inspection that can prevent a catastrophic failure.
You should inspect the ferrule on any cane or walker at least once a month, and plan to replace it proactively. A good rule of thumb is to replace it every six months, regardless of its apparent condition. A new ferrule is an inexpensive investment in safety. Here is a simple 5-second check you can perform regularly:
- Visual Check: Look for any cracks, splits, or areas on the rubber tip that have been worn completely smooth.
- Feel Test: Run your finger across the bottom. If it feels slick or smooth instead of textured and grippy, it needs immediate replacement.
- Tread Depth: Just like a car tire, the tread pattern provides grip. If the pattern is no longer visible and the bottom is flat, its gripping ability is gone.
- Wobble Test: Try to wiggle the ferrule on the end of the cane. If there is any looseness or play, it must be replaced immediately to ensure a stable fit.
- Age Rule: Get a permanent marker and write the date you install a new ferrule on the cane shaft just above it. This removes all guesswork for the next replacement.
The « Extension Cord » Error That Causes Fires and Trips Simultaneously
Extension cords and power strips are a modern convenience that become a dual-threat micro-hazard in a senior’s home. They represent a simultaneous risk of both tripping and fire. From an auditor’s perspective, any cord snaking across a floor is a trip wire, plain and simple. It’s a prime example of a ‘catch-point’ for a shuffling foot. The danger is magnified because these cords are often the same color as the floor or carpet, rendering them nearly invisible, especially in lower light conditions. This hazard exists in the very places people spend most of their time, a fact highlighted by research showing that between 43% and 60% of falls happen at home during daily routines.
The second, equally serious threat is fire. Running cords under rugs or carpets is an extremely common but dangerous mistake. This practice not only hides the trip hazard, making it more surprising, but it also prevents the cord from dissipating heat. Over time, the trapped heat can damage the cord’s insulation, leading to a short circuit and potentially a fire. Furthermore, plugging too many appliances into a single extension cord or power strip can overload the circuit, creating another significant fire risk. A frayed or damaged cord is an accident waiting to happen on both fronts.
The guiding principle of an electrical safety audit is simple: the floor is for walking, not for wiring. The goal is to get every single cord off the floor and away from any pathway. This often requires a combination of creative solutions and, in some cases, minor electrical work that is well worth the investment. Here are the non-negotiable solutions for managing cord safety:
- Run all extension cords along walls, securing them with cord covers or clips, never across walkways.
- If cords must cross a path, use a heavy-duty, beveled, and brightly-colored cord protector designed for floor use.
- Install additional outlets where needed to eliminate the reliance on long extension cords. This is the safest long-term solution.
- Use power strips with long cords, but mount the strip itself to the back of furniture (like a nightstand or entertainment center) to keep it off the floor.
- Immediately replace any cord that is frayed, cracked, or damaged in any way.
- Consider investing in furniture with built-in USB ports and power outlets to minimize the need for external cords.
Key Takeaways
- The greatest fall risks are ‘micro-hazards’: tiny height differences in flooring, furniture legs, and rug edges that catch a shuffling foot.
- Effective safety is about managing transitions—both in flooring surfaces and in lighting levels between rooms—to prevent stumbles and temporary blindness.
- Assistive devices like canes are only as safe as their most neglected part; a worn-out rubber ferrule offers no grip and must be checked monthly.
Which Non-Slip Floor Coverings Offer the Best Safety Rating for Kitchens?
The kitchen presents a unique set of flooring challenges. It is, by nature, a « wet zone, » where spills are inevitable. For a senior, a small splash of water on the wrong type of floor can instantly create a surface as slick as ice. When choosing a kitchen floor, aesthetics must take a backseat to a quantifiable measure of safety. The most important metric for any flooring in a potentially wet area is its Dynamic Coefficient of Friction (DCOF) rating. This is the industry standard for measuring how much grip a tile has when wet.
Think of DCOF as a safety score for your floor. A higher number means more grip. From an auditor’s perspective, this isn’t a matter of opinion; it’s a matter of physics. You should never purchase flooring for a kitchen or bathroom without first verifying its DCOF rating. The standard is clear: flooring with a DCOF of 0.42 or greater meets minimum safety standards for areas that may get wet. Anything less is unacceptable for a senior’s home. This single piece of data is more important than the material’s name, brand, or appearance.
When you’re at the store, you may need to ask for the product’s specification sheet to find this rating, but it’s a crucial step. Materials like textured porcelain, matte-finish ceramic, and luxury vinyl tile (LVT) often have excellent DCOF ratings. Polished marble or glossy ceramic, while beautiful, typically have very low ratings and should be avoided at all costs. The following table provides a general comparison of common kitchen flooring materials and their typical safety performance.
| Flooring Type | Typical DCOF Rating | Safety Level | Maintenance Required |
|---|---|---|---|
| Textured Porcelain Tile | 0.50-0.65 | Excellent | pH-neutral cleaners only |
| Luxury Vinyl Tile (LVT) | 0.45-0.55 | Very Good | Regular mopping, avoid wax |
| Matte-finish Ceramic | 0.42-0.50 | Good | Non-slip cleaner required |
| Cork Flooring | 0.45-0.60 | Very Good | Seal annually |
| Rubber Flooring | 0.55-0.70 | Excellent | Simple cleaning |
You now have the framework of a professional fall prevention auditor. The next step is to put this knowledge into action. Begin today by walking through the living space, not as a family member, but with the meticulous, eagle-eyed focus of an auditor looking for the nearly invisible micro-hazards that pose the greatest threat. Start with the most fundamental risk we identified: the floor itself.