Choosing a modular ramp is a critical engineering task where a single miscalculation can lead to serious danger; safety depends on precise geometry, not guesswork.
- Slope is non-negotiable: A ramp that is too short creates a hazardous incline that is impossible for a user to ascend or safely descend.
- Landings are functional, not optional: An undersized landing pad at the doorway will trap a wheelchair, preventing entry or exit.
Recommendation: Prioritize calculating the correct length based on the 1:12 slope ratio *before* considering materials or budget. This single measurement dictates the safety and viability of the entire project.
When a family member suddenly requires a wheelchair, the need for an accessible home entrance becomes an immediate crisis. The standard solution, a permanent concrete ramp, involves permits, contractors, and weeks of construction—time you simply do not have. Modular aluminum ramps present themselves as a fast, effective solution. However, the urgency of the situation often leads to critical, dangerous mistakes. The common advice focuses on basic measurements and material choices, treating the process like a simple assembly project. This approach is flawed and hazardous.
The core issue isn’t about choosing aluminum over wood; it’s about understanding the physics and geometry that make a ramp safe versus a liability. A ramp is not just an inclined plane; it is a piece of medical equipment. Overlooking the critical failure points in its design and installation—such as improper slope geometry, an inadequate maneuvering envelope at the door, or misunderstanding load-bearing integrity—doesn’t just cause inconvenience. It creates a daily risk of falls, strain, or trapping a vulnerable person. You must also check with your local municipality regarding permit requirements, as regulations can vary even for temporary structures.
This guide departs from generic advice. We will not be browsing styles. We will be dissecting the technical specifications and installation protocols from an engineering perspective. The focus is exclusively on identifying and neutralizing the common failure points that arise when a ramp is selected and installed under pressure. We will cover the precise calculation of a safe slope, the non-negotiable requirements for a functional landing, material performance in harsh weather, and the often-ignored details of portability and maintenance that ensure long-term safety and independence.
This article provides a structured breakdown of the essential technical checks required for a safe modular ramp installation. The following summary outlines the critical points you must verify to ensure the safety and functionality of your home access solution.
Table of Contents: How to Choose and Install the Right Modular Ramp for Your Home Entrance?
- Why a « Short Ramp » Can Be Dangerous and How to Calculate the 1:How to Boost Senior Vitality After 65 Without Intense Exercise?
- Aluminum vs Treated Wood: Which Ramp Material Survives Winter Best?
- The Landing Pad Mistake That Traps Wheelchairs at the Door
- How to Install a Portable Folding Ramp for Visiting Relatives?
- When to Check Ramp Traction: A Seasonal Maintenance Schedule
- The Transport Weight Error That Leaves Seniors Stranded at Home
- How to Verify if a « Wheelchair Accessible » Venue Is Truly Senior-Friendly?
- How to Widen Doorways for Wheelchair Access With Minimal Structural Impact?
Why a « Short Ramp » Can Be Dangerous and How to Calculate the 1:How to Boost Senior Vitality After 65 Without Intense Exercise?
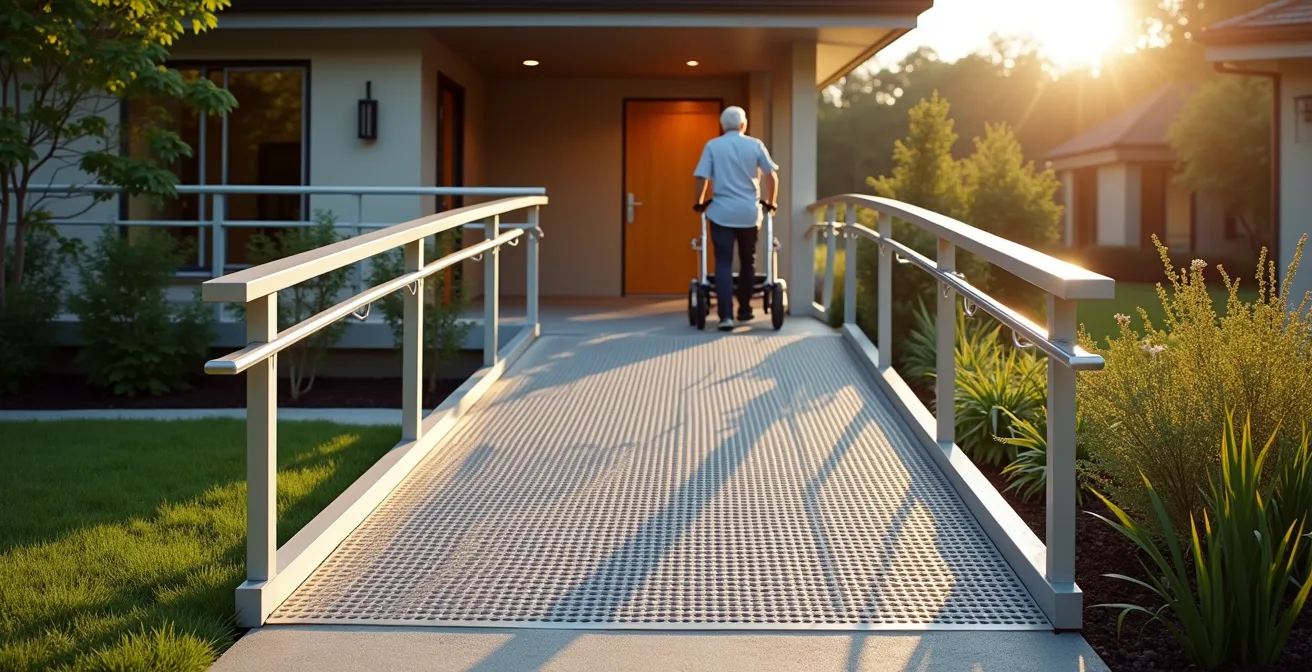
A ramp that is too steep is the single most dangerous and common installation error. It’s not a matter of inconvenience; it’s a critical failure point. A steep incline makes it physically impossible for many seniors to self-propel up the ramp and creates a high-speed, uncontrollable descent. For a caregiver, pushing a person in a wheelchair up a non-compliant slope requires immense physical strength and poses a significant risk of rollback or accident. The temptation to buy a shorter, cheaper ramp to cover the vertical distance is a direct compromise of safety.
The slope geometry is dictated by strict standards for a reason. The Americans with Disabilities Act (ADA) provides the benchmark for safety and accessibility. For any public or commercial ramp, and as a strong recommendation for private residences, the required slope is a 1:12 ratio. This means for every 1 inch of vertical height you need to overcome (the « rise »), you must have 12 inches (1 foot) of ramp length. A steeper 1:10 ratio should only ever be considered if the wheelchair user will always be assisted by a strong, capable caregiver. For a senior who wants to maintain independence by self-propelling, a gentler 1:15 ratio is even better.
For example, if you have three standard steps, each with a 7-inch rise, your total vertical rise is 21 inches. Applying the 1:12 ratio (21 inches x 12), you need a ramp that is at least 252 inches, or 21 feet long. This is a non-negotiable starting point. Attempting to use a 10-foot or 15-foot ramp in this scenario would create a dangerously steep incline. Calculating this correctly is the first and most important step in the entire process. All other decisions are secondary to achieving a safe slope.
Action Plan: Calculating Your Safe Ramp Length
- Measure the total vertical rise: Use a tape measure to find the exact distance in inches from the ground level to the surface of the door threshold where the ramp will rest.
- Apply the ADA 1:12 ratio: Multiply your total vertical rise in inches by 12. This gives you the minimum required ramp length in inches for safe access. Divide by 12 to get the length in feet.
- Consider self-propulsion needs: If the user is a manual wheelchair user with average upper body strength, consider multiplying the rise by 15 (a 1:15 ratio) for a gentler, more manageable slope.
- Evaluate assisted use only: Only multiply by 10 (a 1:10 ratio) if the ramp will exclusively be used with a powerful and physically fit caregiver assisting. This is not recommended for independent use.
- Factor in landings: For any ramp longer than 30 feet, a 60-inch by 60-inch resting platform must be added, which will add to the total footprint of the system.
Ignoring this fundamental calculation is the root cause of most unsafe ramp installations. It transforms a tool for freedom into a household hazard. The length of the ramp is not a suggestion; it is a direct function of the height it must overcome safely.
Aluminum vs Treated Wood: Which Ramp Material Survives Winter Best?
When an immediate access solution is needed, especially with winter approaching, material choice becomes a critical technical decision, not an aesthetic one. Treated wood and aluminum are the two primary options for modular ramps, and their performance in cold, wet weather differs dramatically. While wood can be cheaper initially, its susceptibility to winter conditions often makes it a poor choice for long-term safety and reliability in climates with freeze-thaw cycles.
Treated wood’s primary seasonal failure mode is moisture absorption. When water penetrates the wood and freezes, it causes the material to swell, warp, and crack. This compromises the structural integrity and can create an uneven, hazardous surface. Furthermore, the chemical de-icers used to melt ice can strip the wood’s protective finish, accelerating rot and decay. In contrast, aluminum is impervious to rot and does not absorb water, eliminating the risk of warping from freeze-thaw cycles. Anodized or powder-coated aluminum surfaces also resist corrosion from most de-icing agents, though rock salt (sodium chloride) should be avoided in favor of magnesium chloride.
Another urgent consideration is installation. A modular aluminum ramp can be installed in a few hours directly on frozen ground, as it does not require pouring concrete footers. As one case study shows, this makes it ideal for families needing rapid installation due to a sudden injury or post-surgery recovery. A wood ramp, however, requires excavated footings, which is difficult or impossible to do correctly in frozen soil. This makes winter installation of a wood ramp impractical and can cause significant delays precisely when access is most needed.
The following table, based on an analysis of winter ramp performance, breaks down the key differences.
| Factor | Aluminum | Treated Wood |
|---|---|---|
| De-icer Compatibility | Magnesium chloride safe, avoid rock salt | Chemical de-icers damage finish over time |
| Snow Removal | Plastic shovel only, no metal tools | Stiff broom or plastic shovel safe |
| Temperature Response | Fittings may loosen in extreme cold | Can swell, warp with freeze-thaw cycles |
| Noise Level | Metallic clanging in rain/with walkers | Quiet operation in all weather |
| Winter Installation | Can install on frozen ground | Requires concrete footers, difficult in winter |
While aluminum can be noisier in rain or with walkers, its superior durability, low maintenance requirements, and all-weather installation capability make it the technically superior choice for urgent, long-term accessibility, especially in regions with harsh winters.
The Landing Pad Mistake That Traps Wheelchairs at the Door
A ramp successfully gets a user to the door, but it’s the landing pad that gets them through it. A common and critical mistake is installing a landing that is too small. An undersized platform creates a « trap » where the wheelchair user has no room to turn, open the door, and maneuver inside. They are effectively stuck at their own front door, negating the entire purpose of the ramp. This is not a corner to cut for space or cost; it is a functional necessity.
The required space is not just the footprint of the wheelchair; it is the entire « maneuvering envelope » required for a 90-degree turn while also clearing the arc of an outward-swinging door. ADA standards provide the minimum safe dimensions for this. For a straight approach and turn, a landing must be at least 60 inches by 60 inches (5 feet by 5 feet). This provides the necessary clearance for the front casters and rear wheels to pivot without hitting a wall, the door, or the ramp’s handrails.
This space requirement is absolute. If your door swings outward onto the landing, that 60×60 inch area must be clear *after* accounting for the door’s swing. Many homeowners underestimate this, leading to a platform where the user must back down the ramp to create enough space to open the door, a difficult and dangerous maneuver. The landing must be perfectly level with the door threshold to prevent the chair from getting caught on a lip.
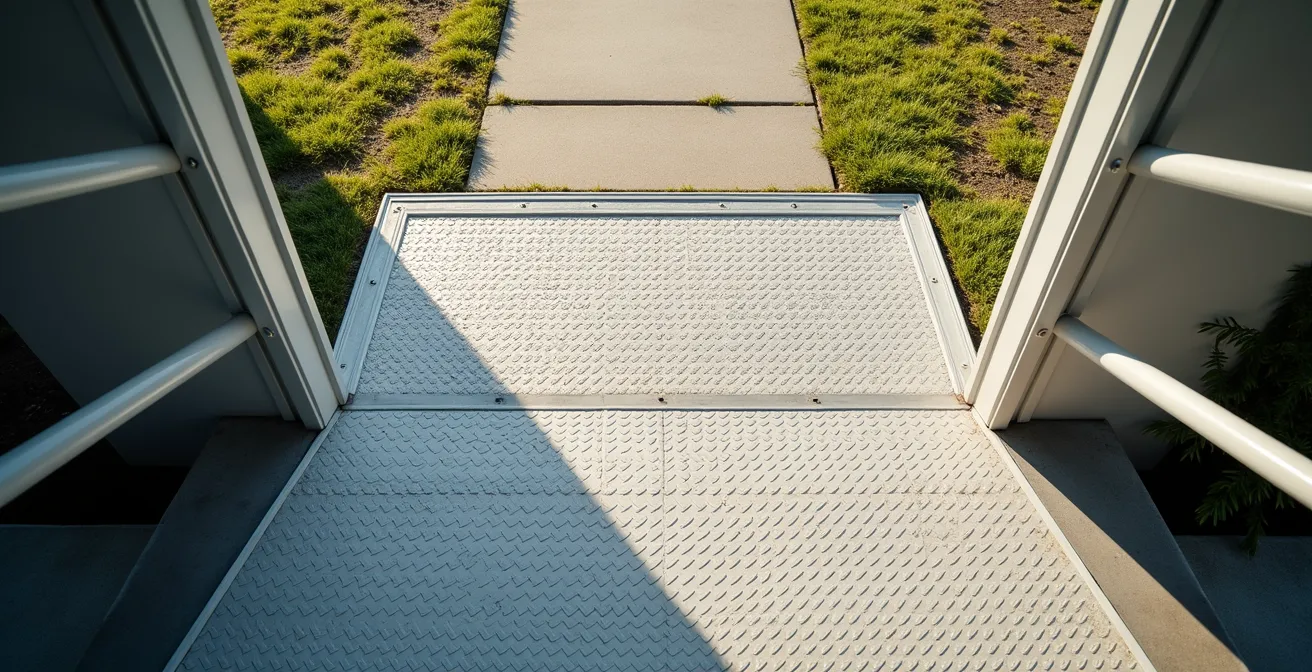
As the image above illustrates, the platform’s purpose is to provide ample turning radius. The subtle wear patterns demonstrate the space needed for frequent turns. Visualizing the door’s swing arc is a critical part of the planning phase to ensure the designated maneuvering envelope remains unobstructed and fully functional at all times.
Ultimately, a ramp system is only as good as its weakest link. A 30-foot ramp with perfect slope is rendered useless by a 3-foot landing that prevents entry. The landing is not an accessory; it is an integral, functional component of the access system.
How to Install a Portable Folding Ramp for Visiting Relatives?
Portable folding ramps are an excellent solution for providing temporary access for visiting family members, but their « temporary » nature often leads to dangerously complacent setup. A portable ramp must be treated with the same technical scrutiny as a permanent one. An improperly placed ramp can slip, damage the doorway, or be set at an unsafe angle, creating a significant fall risk at the point of entry.
The first critical check is the stability of the ground surface. The ramp must be placed on a firm, level, and obstacle-free surface. Placing it on soft grass, uneven pavers, or loose gravel will cause it to rock or shift under load. The top edge of the ramp, known as the lip or transition plate, must rest securely on the door threshold. Best practices dictate that the lip should extend at least 2 inches onto the landing surface to ensure it won’t slip backward during use. Using the included security pins or straps to anchor the ramp to the landing is not optional; it is a mandatory safety step.
Before allowing anyone to use the ramp, a thorough stability test is essential. After placing the ramp, walk on it yourself (without the wheelchair) and deliberately shift your weight from side to side to check for any rocking or movement. If the ramp is unstable, use shims to level it, but ensure they are solid and won’t slip. Never use a portable ramp that exceeds the manufacturer’s recommended rise for its length; this will create the same hazardous slope discussed for permanent ramps. The convenience of a portable ramp must never overshadow the fundamental principles of safe incline and stability.
- Check that the ground surface is flat, stable, and completely free of obstacles or debris.
- Place rubber pads or a protective mat under the ramp’s edges to prevent scratching or damaging the door threshold.
- Ensure the top lip of the ramp is aligned straight and rests securely on the threshold or landing point.
- Test the ramp for any rocking motion on uneven surfaces; use solid, non-slip shims if necessary to create a stable base.
- Verify that the ramp’s lip extends a minimum of 2 inches onto the landing surface to prevent slippage.
- Always secure the ramp using the provided straps, pins, or anchor points before any use.
- Perform a final test run by walking on the ramp yourself to confirm its stability before the first wheelchair use.
A portable ramp is a powerful tool for inclusion, but its safety is entirely dependent on a methodical and diligent setup process. Rushing this step is a direct invitation for an accident.
When to Check Ramp Traction: A Seasonal Maintenance Schedule
An aluminum ramp’s primary safety feature is its textured, high-traction surface. However, this surface is not « set it and forget it. » Its effectiveness can be compromised by environmental factors that change with the seasons. A proactive maintenance schedule is not just good practice; it’s a critical safety requirement to prevent slips and falls, especially in wet or icy conditions. Each season presents a unique « seasonal failure mode » for ramp traction.
In autumn, the primary threat is a buildup of wet leaves. This creates a notoriously slippery organic film on the ramp surface that can be as dangerous as ice. Tree sap can also drip onto the ramp, creating a sticky residue that traps dirt and reduces grip. It’s crucial to sweep the ramp daily and use a solvent like acetone to remove any stubborn sap deposits. As winter arrives, ice becomes the main concern. Never use rock salt (sodium chloride) on an aluminum ramp as it can cause corrosion. Instead, use a de-icer containing magnesium chloride, which is safer for aluminum. Always use a plastic shovel for snow removal, as metal shovels can scrape and damage the ramp’s anti-slip texture.
Spring is the time to inspect for winter damage. Check the entire grip surface for any areas that may have been worn down by shoveling or de-icer. Any worn or peeling grip tape should be replaced immediately. In summer, the danger comes from biological growth. In shaded or damp areas, algae or moss can grow on the ramp surface, creating an extremely slick hazard. A simple « wet test » after a rain shower can reveal slick spots. Scrubbing the ramp with a stiff brush and a mild detergent will remove this growth and restore full traction.

The knurled, high-grip texture shown here is essential for safety. Regular cleaning and inspection ensure that this texture remains effective and free from slippery films, biological growth, or ice, providing reliable traction in all weather conditions.
This routine is a small investment of time that pays significant dividends in safety and peace of mind, preventing the ramp’s most important safety feature from becoming compromised.
The Transport Weight Error That Leaves Seniors Stranded at Home
When selecting a portable or modular ramp, a critical error is to focus solely on the ramp’s weight capacity while ignoring the ramp’s own physical weight. A ramp may have a capacity of 800 lbs, but if the ramp itself weighs 60 lbs and is awkward to handle, it may be too heavy for a senior or a caregiver to deploy. This oversight can render the ramp useless, effectively stranding the user at home or at their destination because the tool meant to provide access is too cumbersome to set up.
The « transport weight » is a key technical specification. The material and design of the ramp dictate this weight. A standard aluminum folding ramp, while durable, can weigh between 30 and 45 lbs, often requiring two people to carry and position safely. For a caregiver who may be a spouse or an older adult themselves, this is not a practical option for daily use. This mismatch between the ramp’s weight and the caregiver’s physical ability is a major failure point in planning for portability.
When frequent transport is required, it is essential to analyze the trade-off between ramp weight, durability, and features designed for portability. For instance, ultra-light carbon fiber ramps weigh as little as 15-25 lbs, making them easily manageable for a single person. Other models, while heavier, are designed in a multi-fold style and include wheels, allowing them to be rolled like luggage rather than carried. Ignoring this factor means buying a ramp that stays in the garage, completely defeating its purpose.
This table breaks down the crucial relationship between ramp weight and its practical application.
| Ramp Type | Weight Range | Best Use Case | Transport Features |
|---|---|---|---|
| Ultra-light Carbon Fiber | 15-25 lbs | Daily caregiver use | Single person carry |
| Standard Aluminum Folding | 30-45 lbs | Occasional use | Two-person recommended |
| Multi-fold with Wheels | 40-60 lbs | Frequent transport | Roll like luggage |
The best ramp is the one that actually gets used. Choosing a ramp that is too heavy or difficult to transport is a planning failure that directly impacts a senior’s freedom and mobility.
How to Verify if a « Wheelchair Accessible » Venue Is Truly Senior-Friendly?
The label « wheelchair accessible » on a public venue can be dangerously misleading for seniors. Compliance with minimum ADA standards does not guarantee practical, safe, or comfortable access for an older user who may have limited stamina or strength. A venue can be technically compliant but functionally inaccessible. Therefore, it is critical to perform your own verification before a visit to avoid arriving at a location that presents insurmountable obstacles.
The first step is to call ahead and ask specific, technical questions. Do not ask « Are you wheelchair accessible? » as the answer will almost always be « yes. » Instead, ask for hard numbers. What is the exact slope ratio of the entrance ramp? A steep 1:12 ramp might be compliant, but exhausting for a senior to self-propel. Are there rest benches along longer ramp runs? A long, uninterrupted ramp can be a major barrier. Ask about the door threshold height; even a half-inch lip can be enough to stop a wheelchair. Another key question is the distance from the accessible parking to the entrance. A 300-foot journey across a parking lot may be too much for some individuals.
The Americans with Disabilities Act specifies that accessible routes must have a minimum clear width of 36 inches. However, this is the absolute minimum. In a busy corridor or a tight turn, this may not be enough. Also, verify if restroom doors are manual or have a push-button automatic operator. A heavy manual door can be impossible for someone with limited upper body strength to open from a seated position. These details, which go beyond basic compliance, are what truly define a senior-friendly accessible space.
Before any visit, use this checklist of questions when speaking to the venue manager:
- What is the exact slope ratio of your main entrance ramp? Is it 1:12, or a gentler slope?
- Are the restroom doors manual or equipped with automatic push-button operators?
- Is there any curb or step between the designated accessible parking and the main entrance pathway?
- What is the measured distance in feet from the closest accessible parking spot to the accessible entrance door?
- For ramps longer than 30 feet, are there level resting platforms provided?
- What is the exact height of the door threshold at the main accessible entrance?
This proactive verification, as detailed in resources from outlets like those focused on senior mobility, shifts the power back to the user and caregiver, allowing them to make informed decisions and avoid venues that are accessible in name only.
Key takeaways
- Ramp length is not optional; it is a direct calculation based on the 1:12 slope-to-rise ratio to ensure safety.
- An undersized landing pad (less than 60×60 inches) is a critical failure that will trap a wheelchair user at the doorway.
- For winter climates, aluminum is technically superior to wood due to its resistance to warping and its ability to be installed on frozen ground.
How to Widen Doorways for Wheelchair Access With Minimal Structural Impact?
Installing the perfect ramp is only half the battle; if the home’s doorways are too narrow, access is still denied. The standard for comfortable wheelchair passage is a clear width of 36 inches, a dimension many older homes do not meet. While a full structural renovation to widen a doorway is costly and disruptive, there are several highly effective, non-structural modifications that can be made immediately to gain precious inches of clearance.
The most impactful and simplest solution is to replace standard door hinges with swing-clear or offset hinges. These specialized hinges are designed to swing the door completely out of the doorway when opened, rather than leaving it partially in the frame. This single change can add up to 2 full inches of usable clear space, often being the difference between a tight squeeze and comfortable passage. This is a fast, low-cost modification that has a significant impact.
Other strategies involve removing non-essential parts of the doorway. In many cases, the doorstop molding—the thin strip of wood inside the frame that the door rests against when closed—can be carefully removed. This can provide an extra half-inch to an inch of width. For doorways between public rooms like a living room and dining room, consider removing the door entirely. If a visual barrier is still desired, replacing a traditional swinging door with a surface-mounted barn door can free up the entire width of the doorframe, as the door slides along the wall instead of swinging into the space.
These minor adjustments, when combined, can significantly improve maneuverability without the need for a single sledgehammer. According to ADA accessibility standards, achieving a 36-inch clear width is the goal, and these non-structural methods are the fastest way to get there. They should be the first line of attack before considering more invasive and expensive construction projects. The priority is to create a safe and accessible path of travel throughout the home with minimal disruption.
For families needing to create an accessible environment quickly, exploring these immediate, low-impact solutions is the most logical and efficient next step after ensuring safe entry into the home.